
Recycled Magazine Easter Baskets
Or An Introduction Into Magazine Containers
 Now, I'm not one to get too festive for Easter (or any holiday besides Christmas), but my mom was getting ready to have a girl's craft weekend with some friends and she wanted to take a seasonal goodie to share. I had created a little catch-all bowl a while back out of magazines, to hold earrings and bobby pins and the like, and she wanted to know how it was done. I suggested I show her how but that we make them into Easter baskets, and thus this DIY was born.
What you'll need:

1. Start by ripping out a bunch of pages from your old magazine(s). To give you an idea, I used one thick magazine to create these 6 mini baskets, with lots of pages still left to spare. You'll want to fold the pages long ways, multiple times, as many times as you can until they are thin, strong strips (about 1/4 in wide).
2. Once you've gotten a bit folded you can start with the base of the basket. You'll want to roll the first piece up nice and tight to make a spiral.
3. Hot glue in place a little bit at a time as you go, creating a nice spiral. Leave a little tab at the end of the piece unglued, you'll see why below!

4. When I add a new piece on, I prefer to interlock the strips. This will make your basket more seamless and sturdy. You can then continue gluing and wrapping.
5. Continue adding more pieces until you've reached your desired base circumference. For the mini baskets I used 4 to 6 strips for the base (This is also a good time to flatten the base out a bit, by gently pushing the bottom against the flat surface you are working on, to ensure your basket will sit level). Then add on a new strip as normal, interlocking the two, but instead of bringing the new strip even with the base, slightly start to spiral upwards.
6. You want to make sure that you continue upward SLOWLY and spiral outward, if not you may end up just creating a cylinder, not a basket shape. Add a new piece or two, and then run your thumbs around the inside of the basket to ensure your are getting the rounded shape you want. This part is a little tricky, but once you add a few layers you'll get the hang of it. Continue until your basket is as tall as you like (it will look really cool on the inside)!
7. To add a handle, take a nice folded strip and glue it shut. I would glue the middle fold and hold it together and then do a bit of glue along the edge to ensure it stays put. Gluing will make you strip stiff, so run it along the edge of your table, pulling downward at an angle, creating a nice curved shape. Then decide where you want to secure the handle.
8. Secure both sides of the handle to your basket using hot glue. If it is longer than you would like, simply trim the piece down. I also like to add one more strip layer around the entire basket over the handle to make sure it is really secure and to make it more seamless. And you're done!

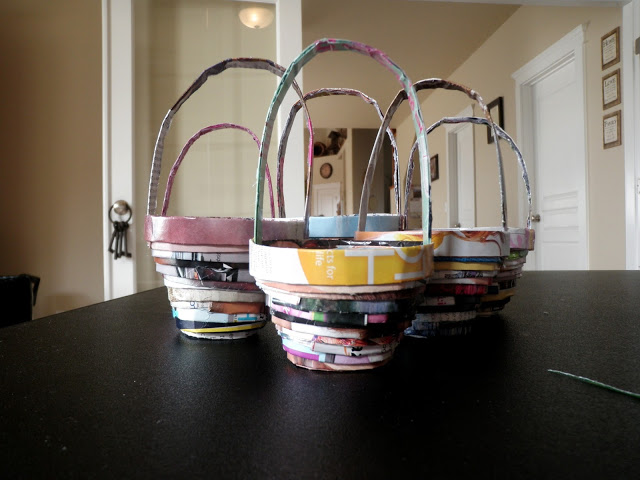
Fill your basket with some cute fabric eggs (maybe mini egges?) or candy or make a bunch for decoration. Of course, these are mini baskets. but I think they are really adorable. And once you learn the technique, you could make a large basket if you so desire, or any kind of container, really!

What you'll need:
- old magazines
- scissors
- hot glue gun
2. Once you've gotten a bit folded you can start with the base of the basket. You'll want to roll the first piece up nice and tight to make a spiral.
3. Hot glue in place a little bit at a time as you go, creating a nice spiral. Leave a little tab at the end of the piece unglued, you'll see why below!
5. Continue adding more pieces until you've reached your desired base circumference. For the mini baskets I used 4 to 6 strips for the base (This is also a good time to flatten the base out a bit, by gently pushing the bottom against the flat surface you are working on, to ensure your basket will sit level). Then add on a new strip as normal, interlocking the two, but instead of bringing the new strip even with the base, slightly start to spiral upwards.
6. You want to make sure that you continue upward SLOWLY and spiral outward, if not you may end up just creating a cylinder, not a basket shape. Add a new piece or two, and then run your thumbs around the inside of the basket to ensure your are getting the rounded shape you want. This part is a little tricky, but once you add a few layers you'll get the hang of it. Continue until your basket is as tall as you like (it will look really cool on the inside)!
8. Secure both sides of the handle to your basket using hot glue. If it is longer than you would like, simply trim the piece down. I also like to add one more strip layer around the entire basket over the handle to make sure it is really secure and to make it more seamless. And you're done!
Fill your basket with some cute fabric eggs (maybe mini egges?) or candy or make a bunch for decoration. Of course, these are mini baskets. but I think they are really adorable. And once you learn the technique, you could make a large basket if you so desire, or any kind of container, really!